Encrypt and decrypt

using System;
using System.Collections.Generic;
using System.Text;
using System.Windows.Forms;
using System.Threading;
using System.IO;
using System.Diagnostics;
using System.Security.Cryptography;

namespace MMT
{
    public class Encryptdata
    {

//ENCRYPT THE PASSWORD KEY(OPEN,EDIT)


        public static string Encrypt(string originalString)
        {
            if (String.IsNullOrEmpty(originalString))
            {
                originalString = "NO";
                //throw new ArgumentNullException("The string which needs to be encrypted can not be null.");
            }

            DESCryptoServiceProvider cryptoProvider = new DESCryptoServiceProvider();
            MemoryStream memoryStream = new MemoryStream();
            CryptoStream cryptoStream = new CryptoStream(memoryStream, cryptoProvider.CreateEncryptor(bytes, bytes), CryptoStreamMode.Write);

            StreamWriter writer = new StreamWriter(cryptoStream);
            writer.Write(originalString);
            writer.Flush();
            cryptoStream.FlushFinalBlock();
            writer.Flush();

            return Convert.ToBase64String(memoryStream.GetBuffer(), 0, (int)memoryStream.Length);
        }


        static byte[] bytes = ASCIIEncoding.ASCII.GetBytes("ZeroCool");

        public static string Decrypt(string cryptedString)
        {
            if (String.IsNullOrEmpty(cryptedString))
            {
                cryptedString = "NO";
                cryptedString = Encrypt(cryptedString);
                //throw new ArgumentNullException("The string which needs to be decrypted can not be null.");
           }

            DESCryptoServiceProvider cryptoProvider = new DESCryptoServiceProvider();
            MemoryStream memoryStream = new MemoryStream(Convert.FromBase64String(cryptedString));
            CryptoStream cryptoStream = new CryptoStream(memoryStream, cryptoProvider.CreateDecryptor(bytes, bytes), CryptoStreamMode.Read);
            StreamReader reader = new StreamReader(cryptoStream);

            return reader.ReadToEnd();
        }
     } 

}

WPF Tutorial - Using The Clipboard

WPF Tutorial - Using The Clipboard

So I just noticed that we here at SOTC have never talked about the clipboard before - and for such a common (and annoying) part of software, that is just horribly lax on our part. So here I am to rectify the situation - we will be taking a look today at how to use the clipboard in WPF.
Working with the clipboard can be quite painful sometimes in .NET applications, since all we get is is a very thin wrapper around the OLE clipboard calls (and so if anything goes wrong, nasty COM exceptions get thrown). It also doesn't help that since the clipboard is a shared resource among all applications on a computer, your application is not guaranteed to be able to use it at any given point in time. So today we are going to take a look at how to deal with those situations while adding data to and getting data from the clipboard. And don't worry, we will look at using our own custom formats for that data as well.
So first off, how do you get to the clipboard at all? Well, you use the Clipboard class, in the System.Windows namespace. This static class has a number of methods on it for querying and interacting with the clipboard in a number of ways. However, the three important ones to start off with are SetData, ContainsData, and GetData. In a general sense, they do exactly what you might expect - put some data on the clipboard, check if a certain type of data is on the clipboard, and get a certain type of data off of the clipboard.
Now, because the clipboard is again a shared resource, it can't know anything about .NET types (or any particular language's types for that matter). That means that the way to identify types of data on the clipboard are through format strings. There are a number of standard format strings that represent standard formats, and you can get to those through the DataFormats class. So, for instance, you wanted to put some text on the clipboard, you would call:
Clipboard.SetData(DataFormats.Text, "A String");
As you might expect, if you want to check if there is any text on the clipboard, you would call:
if(Clipboard.ContainsData(DataFormats.Text))
{
  //Do Stuff
}
And finally, to get a copy of that text off of the clipboard, you would call:
string myStr = Clipboard.GetData(DataFormats.Text) as string;

//Do Stuff
Now, for the common formats like Text, there are some simple wrapper functions on the Clipboard class, like SetText, ContainsText, and GetText. But all they do is call the corresponding data function with the correct data format.
Ok, but what about custom data? Well, it is actually really easy. For instance, say I wanted to store an instance of the following class on the clipboard for some reason:
public class MyInfo
{
  public int MyNumber { get; set; }
  public string MyString { get; set; }
}
The first thing that we need to do is mark it as Serializable, because that is how .NET places data on the clipboard (it serializes it). So now the class definition will look like so:
[Serializable]
public class MyInfo
{
  public int MyNumber { get; set; }
  public string MyString { get; set; }
}
Now, we just need to choose a sufficiently unique format string - generally, I just go with the name of the class I'm putting on the clipboard, so in this case, "MyInfo". And now we can just call SetData:
MyInfo info = new MyInfo();
info.MyNumber = 10;
info.MyString = "10";

Clipboard.SetData("MyInfo", info);
And pulling that data off the clipboard again is as simple as the following:
MyInfo info = Clipboard.GetData("MyInfo") as MyInfo;
Ok, now that we have all that out of the way, we can go into the nitty-gritty. So one useful thing to know is that whenever you call SetData, you are replacing the current contents of the clipboard with whatever you are setting. Another thing to note is that the call to SetData immediately copies whatever you are handing it, so you can feel free to destroy or modify your original afterward, and in addition every call to GetData will return a new copy of the data. For instance:
MyInfo info1 = new MyInfo();
info1.MyNumber = 10;
info1.MyString = "10";

Clipboard.SetData("MyInfo", info1);

info1.MyNumber = 12;
info1.MyString = "Q";

MyInfo info2 = Clipboard.GetData("MyInfo") as MyInfo;

Console.WriteLine("Info2: " + info2.MyNumber + " " + info2.MyString);

info2.MyNumber = 34;
info2.MyString = "A";

MyInfo info3 = Clipboard.GetData("MyInfo") as MyInfo;

Console.WriteLine("Info3: " + info3.MyNumber + " " + info3.MyString);
The output:
Info2: 10 10
Info3: 10 10
The other very important thing to know is that any one of these clipboard calls can fail without warning. The MSDN documentation does not state this, but they can all throw exceptions of type COMException. The most common one that I've seen has the error "CLIPBRD_E_CANT_OPEN" which means that the application was unable to open the clipboard. This is generally because another application currently has the clipboard open. The sad thing about this is that generally the best thing to do is to just try again in a moment, because it will probably work. So for example, the 'correct' version of the SetData call above looks something like this:
MyInfo info1 = new MyInfo();
info1.MyNumber = 10;
info1.MyString = "10";

try
{
  Clipboard.SetData("MyInfo", info1);
}
catch(System.Runtime.InteropServices.COMException)
{
  System.Threading.Thread.Sleep(0);
  try
  {
    Clipboard.SetData("MyInfo", info1);
  }
  catch(System.Runtime.InteropServices.COMException)
  {
    MessageBox.Show("Can't Access Clipboard");
  }
}
Yes, I know that that is horrific and ugly and all sorts of bad things - but it is actually the recommended way to deal with the situation. So generally, in any application where I need to do a lot of clipboard activity, I will write a helper class that wraps the standard clipboard call, so that this try block doesn't have to be littered everywhere. In case you were wondering, the reason that thread sleep is there is to give whatever other application currently has the clipboard open some time to finish and close it. If we didn't give any time, it is almost guaranteed that the second call will fail too.
Ok, what else is there...ah yes, clear! Generally, there isn't any need to do this, but the clipboard class does give a way to clear the clipboard, the Clear function:
Clipboard.Clear();
Yeah, nothing really special there. And actually, all it is is a wrapper to the underlying OleSetClipboard where it is passing null as the DataObject.
And that brings us to the DataObject! What is the DataObject you ask? Well, it turns out that all these clipboard calls we have looked at so far are actually just manipulating a DataObject and then putting that object on the clipboard. It is actually the DataObject that is answering all those questions about what types of data the clipboard contains. The reason we care about the DataObject is because it allows us to put multiple formats of data on the clipboard at the same time. Take a look at the following:
MyInfo info1 = new MyInfo();
info1.MyNumber = 10;
info1.MyString = "10";

DataObject data = new DataObject();
data.SetData("MyInfo", info1);
data.SetData(DataFormats.Text, "Info: "
    + info1.MyNumber + " " + info1.MyString);

Clipboard.SetDataObject(data);
In this example, we are placing two data formats in a DataObject, and then calling SetDataObject to place it on the clipboard. This way, we can get the specialized "MyInfo" data back out later, but other applications can get the text out if they want to.
There is also a corresponding GetDataObject call on Clipboard, which, instead of returning a particular format of data, will return the entire DataObject on the clipboard. This allows you to do things like the following:
IDataObject data = Clipboard.GetDataObject();
string[] formats = data.GetFormats();

foreach (string format in formats)
  Console.WriteLine(format);
That code prints out the names of all the available data formats on the clipboard. If you are observant, you may have noticed that GetDataObject actually returns an IDataObject, not a DataObject. This interface allows you to write your own special kinds of DataObjects, in case you don't like some of the behaviors of the standard .NET one. But that is stuff for an advanced tutorial!
Well, that about covers it for this crash course in using the clipboard in WPF. If there is anything in particular that was unclear or that you would like me to go into more detail one, let me know in the comments.

Clip board

Q:
What is the Windows Clipboard?
A:
The Windows clipboard is used to temporarily store stuff. This “stuff” can come in the form of just about anything. Images, files, documents, etc.—they can all be placed on the clipboard. Once something has been copied to the clipboard it can be pasted into another location.
The clipboard isn’t a program you can actually access and play with. It’s a built-in windows component that works transparently. When you copy or cut, the info is put onto this clipboard. When you paste, the information that’s on the clipboard is put into whatever it is you’re working on.
For instance, if I have some information on a web page that I want to put into a word processing document, this is what would happen:
1. I highlight and copy (CTRL-C) the text from the web page. When I do this, the text is placed on the clipboard.
2. Now, I open my word processor (MS Word 2000 and up must be open before you copy). Right now, the info is still sitting on the clipboard and can be pasted into my word processor or any other program that can handle text.
3. OK, now I right-click a blank area of my word processing document and choose Paste from the resulting menu (or just use CTRL-V) . This will take the info that’s currently sitting on the clipboard (i.e. the web page text in this case) and attempt to put it into my word processing document.
I say “attempt to put the info on the clipboard into the word processor” because sometimes the info that’s on your clipboard is not compatible with the program you’re using. For example, if you try to paste a picture into notepad, that just isn’t going to work.
For example, lets say you were working on a report in MS Word and you would like to quote some information you uncovered on the web. Rather than printing out the web page and re-typing the block of text you would like to quote, you can highlight the text on the webpage and copy it to the clipboard (highlight by holding down your left mouse button and dragging it over the section of text you would like to have. Copy it by right-clicking that section of text and selecting Copy from the menu that pops up).
Now, head back to MS Word and position the cursor where you would like to insert the text. Hit CRTL-V (or click the Edit menu, Paste ), and presto, the web page text you copied has now been pasted into your Word doc.
Oh, for more on Copy & Paste head to:
http://www.worldstart.com/tips/copypaste.htm

How to store a single quote (') in a character variable in c#.

char ch='\'';
that is single cote \ single cote single cote.

Why

Why interface over abstract
------------------------------------
Interface can fill gap of multiple inheritance. One can
implement from more than one interface. Not same with Abstract. One can inherit
from only one abstract class.


Interfaces are useful when you do not want classes to inherit from unrelated classes just to get the required functionality. For example, let bird be a class with a method fly(). It will be ridiculous for an aeroplane to inherit from bird class just because it has the fly() method. Rather the fly() method should be defined as an interface and both bird and aeroplane should implement that interface.

Enable and disable / check and uncheck a html checkbox in javascript

Inside javascript
-----------------------------
function click()
    {
          var checkbox=document.getElementById("checkboxname");
       if (checkbox.checked)
       {      
       document.getElementById("checkboxname").disabled = false;
       document.getElementById("checkboxname").checked=false;
        }
   }

Html
-------------------
<input type="checkbox" value=1 onClick="return click();" id="checkboxname" name="checkboxname">


On Cascade

CREATE TABLE employee (emp_no INTEGER NOT NULL CONSTRAINT prim_empl PRIMARY KEY,
emp_fname CHAR(20) NOT NULL,
emp_lname CHAR(20) NOT NULL,
dept_no CHAR(4) NULL)

CREATE TABLE project (project_no CHAR(4) NOT NULL CONSTRAINT prim_pro PRIMARY KEY,
project_name CHAR(15) NOT NULL,
budget FLOAT NULL)

CREATE TABLE works_on1
(emp_no INTEGER NOT NULL,
project_no CHAR(4) NOT NULL,
job CHAR (15) NULL,
enter_date DATETIME NULL,
CONSTRAINT prim_works1 PRIMARY KEY(emp_no, project_no),
CONSTRAINT foreign1_works1 FOREIGN KEY(emp_no) REFERENCES employee(emp_no) ON DELETE CASCADE,
CONSTRAINT foreign2_works1 FOREIGN KEY(project_no) REFERENCES project(project_no) ON UPDATE CASCADE)

-- The creation of the works_on1 table that uses the ON DELETE CASCADE and ON UPDATE CASCADE options

Sql Join

SQL SERVER – Introduction to JOINs – Basic of JOINs

INNER JOIN

This join returns rows when there is at least one match in both the tables.

OUTER JOIN

There are three different Outer Join methods.
LEFT OUTER JOIN
This join returns all the rows from the left table in conjunction with the matching rows from the right table. If there are no columns matching in the right table, it returns NULL values.
RIGHT OUTER JOIN
This join returns all the rows from the right table in conjunction with the matching rows from the left table. If there are no columns matching in the left table, it returns NULL values.
FULL OUTER JOIN
This join combines left outer join and right after join. It returns row from either table when the conditions are met and returns null value when there is no match.

CROSS JOIN

This join is a Cartesian join that does not necessitate any condition to join. The resultset contains records that are multiplication of record number from both the tables.

Additional Notes related to JOIN:

The following are three classic examples to display where Outer Join is useful. You will notice several instances where developers write query as given below.
SELECT t1.*
FROM Table1 t1
WHERE t1.ID NOT IN (SELECT t2.ID FROM Table2 t2)
GO
The query demonstrated above can be easily replaced by Outer Join. Indeed, replacing it by Outer Join is the best practice. The query that gives same result as above is displayed here using Outer Join and WHERE clause in join.
/* LEFT JOIN - WHERE NULL */
SELECT t1.*,t2.*
FROM Table1 t1
LEFT JOIN Table2 t2 ON t1.ID = t2.ID
WHERE t2.ID IS NULL
The above example can also be created using Right Outer Join.
NOT INNER JOIN
Remember, the term Not Inner Join does not exist in database terminology. However, when full Outer Join is used along with WHERE condition, as explained in the above two examples, it will give you exclusive result to Inner Join. This join will give all the results that were not present in Inner Join.
You can download the complete SQL Script here, but for the sake of complicity I am including the same script here.
USE AdventureWorks
GO
CREATE TABLE table1
(ID INT, Value VARCHAR(10))
INSERT INTO Table1 (ID, Value)
SELECT 1,'First'
UNION ALL
SELECT 2,'Second'
UNION ALL
SELECT 3,'Third'
UNION ALL
SELECT 4,'Fourth'
UNION ALL
SELECT 5,'Fifth'
GO
CREATE TABLE table2
(ID INT, Value VARCHAR(10))
INSERT INTO Table2 (ID, Value)
SELECT 1,'First'
UNION ALL
SELECT 2,'Second'
UNION ALL
SELECT 3,'Third'
UNION ALL
SELECT 6,'Sixth'
UNION ALL
SELECT 7,'Seventh'
UNION ALL
SELECT 8,'Eighth'
GO
SELECT *
FROM Table1
SELECT *
FROM Table2
GO
USE AdventureWorks
GO
/* INNER JOIN */
SELECT t1.*,t2.*
FROM Table1 t1
INNER JOIN Table2 t2 ON t1.ID = t2.ID
GO
/* LEFT JOIN */
SELECT t1.*,t2.*
FROM Table1 t1
LEFT JOIN Table2 t2 ON t1.ID = t2.ID
GO
/* RIGHT JOIN */
SELECT t1.*,t2.*
FROM Table1 t1
RIGHT JOIN Table2 t2 ON t1.ID = t2.ID
GO
/* OUTER JOIN */
SELECT t1.*,t2.*
FROM Table1 t1
FULL OUTER JOIN Table2 t2 ON t1.ID = t2.ID
GO
/* LEFT JOIN - WHERE NULL */
SELECT t1.*,t2.*
FROM Table1 t1
LEFT JOIN Table2 t2 ON t1.ID = t2.ID
WHERE t2.ID IS NULL
GO
/* RIGHT JOIN - WHERE NULL */
SELECT t1.*,t2.*
FROM Table1 t1
RIGHT JOIN Table2 t2 ON t1.ID = t2.ID
WHERE t1.ID IS NULL
GO
/* OUTER JOIN - WHERE NULL */
SELECT t1.*,t2.*
FROM Table1 t1
FULL OUTER JOIN Table2 t2 ON t1.ID = t2.ID
WHERE t1.ID IS NULL OR t2.ID IS NULL
GO
/* CROSS JOIN */
SELECT t1.*,t2.*
FROM Table1 t1
CROSS JOIN Table2 t2
GO
DROP TABLE table1
DROP TABLE table2
GO
I hope this article fulfills its purpose. I would like to have feedback from my blog readers.  Please suggest me where do you all want me to take this article next.

String.join() method

You want to combine strings in your C# program using the string.Join static method. This allows you to easily divide parts of an output string with commas or other delimiters. string

Use string.Join

Here we see a basic example of how you can combine strings in an array or List into a new single string with dividing characters in it. The example that follows will produce the output with separating commas.
Program that joins strings [C#]

using System;

class Program
{
    static void Main()
    {
 string[] arr = { "one", "two", "three" };
 Console.WriteLine(string.Join(",", arr)); // "string" can be lowercase, or
 Console.WriteLine(String.Join(",", arr)); // "String" can be uppercase
    }
}

Output

one,two,three
one,two,three
Description of the example code.
Static method. Here we note that string.Join in C# is a static method, meaning it does not need to be called on an instance of string. It concatenates strings together with a separator string in between them.

HTML example

Here we see how you can use string.Join to concatenate strings of HTML. Often with HTML you need a separating tag or element, such as a <br/> tag or horizontal rule. Join solves this problem elegantly because it doesn't insert the separating tag at the end.
Program that joins HTML strings [C#]

using System;

class Program
{
    static void Main()
    {
 // Problem: combine these words into lines in HTML
 string[] dinosaurs = new string[] { "Aeolosaurus",
     "Deinonychus", "Jaxartosaurus", "Segnosaurus" };

 // Solution: join with break tag.
 string html = string.Join("<br/>\r\n", dinosaurs);
 Console.WriteLine(html);
    }
}

Output

Aeolosaurus<br/>
Deinonychus<br/>
Jaxartosaurus<br/>
Segnosaurus
Description of the example code. There is a string[] array declared at the beginning of the code. Those strings are concatenated with Join into four lines of markup in HTML, separated by the BR tag.

string.Join versus append

String.Join is different from appending many strings together in a loop, such as with StringBuilder, because it does not insert the delimiter or separator at the end of the operation. It only inserts the delimiter in between the strings.

Rewrite StringBuilder

Here we see how you can replace confusing code that appends strings in loops with much simpler string.Join code. The string.Join method is often much faster in addition to being simpler. The two methods below, CombineA and CombineB, have the same output.
 

using System;
using System.Text;

class Program
{
    static void Main()
    {
 string[] catSpecies = { "Aegean", "Birman", "Main Coon", "Nebulung" };
 Console.WriteLine(CombineA(catSpecies));
 Console.WriteLine(CombineB(catSpecies));
    }

    /// <summary>
    /// Combine strings with commas.
    /// </summary>
    static string CombineA(string[] arr)
    {
 return string.Join(",", arr);
    }

    /// <summary>
    /// Combine strings with commas.
    /// </summary>
    static string CombineB(string[] arr)
    {
 StringBuilder builder = new StringBuilder();
 foreach (string s in arr)
 {
     builder.Append(s).Append(",");
 }
 return builder.ToString().TrimEnd(new char[] { ',' });
    }
}

Output

Aegean,Birman,Main Coon,Nebulung
Description of the example code. As noted, the two methods CombineA and CombineB both concatenate each string into a single string with separators. The species of cats are outputted as a single string. The final method shown above, CombineB, has to use the ToString() and TrimEnd() methods to convert the StringBuilder into the result.
ToString UsageTrimEnd, Removing Trailing Chars

Parameters

You can specify four parameters on string.Join, with the last two being the startIndex and the count. This overload is rarely useful in my experience, but could simplify some code.
msdn.microsoft.comExceptions

Exceptions

String.Join can throw three different exceptions: ArgumentNullException, ArgumentOutOfRangeException, and OutOfMemoryException. The first two exceptions are possible quite often, and you should be ready for them. The following example shows one possible exception.
ArgumentNullExceptionArgumentOutOfRangeExceptionOutOfMemoryException
Program that throws exception on Join [C#]

using System;

class Program
{
    static void Main()
    {
 try
 {
     string bug = string.Join(null, null); // Null arguments are bad
 }
 catch (Exception ex)
 {
     Console.WriteLine(ex);
 }
    }
}

Output

System.ArgumentNullException: Value cannot be null.
Parameter name: value
Description of the example code. This code demonstrates what happens when you call string.Join with null parameters. It will throw the ArgumentNullException. Depending on your application, this must be dealt with.

Join List

In real-world programs, the List collection is used frequently and it often contains strings. You can use string.Join to concatenate these strings quickly. You have to call ToArray() on your List and pass it as the second parameter to string.Join. Alternatively, you can use the generic version of string.Join; please see the distinct article.
Join String List
Program that joins on List [C#]

using System;
using System.Collections.Generic;

class Program
{
    static void Main()
    {
 // List of cities
 List<string> cities = new List<string>();
 cities.Add("New York");
 cities.Add("Mumbai");
 cities.Add("Berlin");
 cities.Add("Istanbul");

 // Join strings into one CSV line
 string line = string.Join(",", cities.ToArray());
 Console.WriteLine(line);
    }
}

Output

New York,Mumbai,Berlin,Istanbul
Description of the example code. The Main method first creates a List of strings, and then converts the List into a string[] array using ToArray(). string.Join returns all the strings combined into one with separators.

Benchmark

Here we test the general performance of string.Join. I wanted to see the ballpark numbers for string.Join to ensure that it doesn't cause a severe slowdown. We see that string.Join performs well and often better than loops. Please see the figures at the top of this article.
Data used in benchmark

string[] arr = { "one", "two", "three", "four", "five" };

Methods that were benchmarked [C#]
    1000000 iterations were tested.

static string CombineA(string[] arr)
{
    return string.Join(",", arr);
}

static string CombineB(string[] arr)
{
    var builder = new System.Text.StringBuilder();
    foreach (string s in arr)
    {
 builder.Append(s).Append(",");
    }
    return builder.ToString(); // Has ending comma [difference]
}

Results

string.Join:                 157 ms [faster]
StringBuilder Append method: 270 ms

Required Join method results

Input:  one
 two
 three
Output: one*two*three
Description of benchmarked code. The two methods shown above, CombineA and CombineB, compare string.Join to a StringBuilder loop. They return different strings: CombineA does not have a comma at the end of its result, while CombineB does. Using TrimEnd to remove the comma makes CombineB slower.

Summary

Here we saw several examples of string.Join in the C# language, using comma-separated values and HTML. Finally I established that string.Join has excellent performance for common usages. We also explored the exceptions you can raise with string.Join.

Use & Call RegisterStartUpScript, RegisterClientScript and Client-Side Script

RegisterStartupScript

Using RegisterStartupScript we can write a JavaScript function in code behind and call it from code-behind or from HTML. Look at the code below for reference.

Calling & Writing JavaScript Function from Server Side Code Behind

private void Page_Load(object sender, System.EventArgs e)
{
    string jScriptValidator;
    jScriptValidator="<script> function ReqFieldValidator()" + 
                " { if (document.forms[0].txtField.value == '') \n"; 
    jScriptValidator+="{ alert('TextBox cannot be empty') \n ";
    jScriptValidator+="return false; \n";
    jScriptValidator+="} \n";
    jScriptValidator+=" return true \n";
    jScriptValidator+=" } </script>";
    Page.RegisterStartupScript("regJSval",jScriptValidator);
    btnSubmit.Attributes.Add("onclick","return ReqFieldValidator()");
}

Writing JavaScript Function in Server Side Code Behind and Calling from HTML

//Server side

private void Page_Load(object sender, System.EventArgs e)
{
    string jScript;
    jScript="<script>function JavScriptFn(){alert" + 
      " ('Client Function in javascript is call')}</script>";
}

//HTML side
< A onclick="JavScriptFn()" >
< asp:Label id="Label1" runat="server" Width="281px" 
   ForeColor="#8080FF">Click to call Javascript function.
</asp:Label> >/A >

Writing JavaScript in HTML and Calling it from Code-behind

<Head >
        <script>
        
        function ReqField1Validator()
        { 
         if (document.forms[0].txtField1.value == '') 
            {
                alert('TextBox cannot be empty') 
                return false
            } 
                return true 
        } 
                
        </script>
    </Head >

private void Page_Load(object sender, System.EventArgs e)
{
    btnOK.Attributes.Add("onclick","return ReqField1Validator()");
}

RegisterClientScriptBlock

Suppose we want JavaScript code to be executed but not a function. In that case, we make use of RegisterClientScriptBlock.RegisterClientScriptBlock which helps to make server side code as well as client side code inline to each other.

private void btnClientBlock_Click(object sender, System.EventArgs e)
{
    string jScript;
    jScript="<script>alert ('Javascript block of code executed')</script>";
    Page.RegisterClientScriptBlock("keyClientBlock",jScript);
    lblSequencial.Text="Remaining part of the code executed";
}

ASP.NET 2.0 RegisterClientScriptBlock/RegisterStartupScript

One can call JavaScript client side function directly from code behind using RegisterStartupScript. If one wants JavaScript to be embedded into codebehind, then make use of RegisterClientScriptBlock:

<script>
    function fnShowMessage()
    {
        alert(" Invoke Javascript function from Server Side Code Behind ");
    }
    </script>

protected void Button1_Click(object sender, EventArgs e)
    {
        ClientScript.RegisterStartupScript
  (GetType(),"Javascript", "javascript: fnShowMessage(); ",true);
    }
    protected void Button2_Click(object sender, EventArgs e)
    {
        ClientScript.RegisterClientScriptBlock(GetType(), "Javascript", 
  "<script>alert('Record Added Successfully')</script>");
    }
Hope you find the above article helpful. Any suggestions are most welcome.

Email and website validation using javascript

<script language="javascript">
function validate(form_id,email) {
   var reg = /^([A-Za-z0-9_\-\.])+\@([A-Za-z0-9_\-\.])+\.([A-Za-z]{2,4})$/;
   var address = document.forms[form_id].elements[email].value;
   if(reg.test(address) == false) {
      alert('Invalid Email Address');
      return false;
   }
}

</script>

<body>

<form id="form_id" method="post"  onsubmit="javascript:return validate('form_id','email');">
   <input type="text" id="email" name="email" />
   <input type="submit" value="Submit" />
</form>
</body> 

WEBSITE VALIDATION
------------------------------------

function validate()
 {
   var reg = /^http(s)?:\/\/([\w-]+\.)+[\w-]+(\/[\w- .\/?%&=]*)?$/;
   var address = document.getElementById("email").value;
   if(reg.test(address) == false) {
      alert('Invalid Email Address');
      return false;
      }
   }

Use javascript along with ASP.Net page

Calling javascript from the page load with out any event fire

protected void Page_Load(object sender, EventArgs e)
    {
        if (!IsPostBack)
        {
            Page.ClientScript.RegisterStartupScript(this.GetType(),"onLoad","DisplaySessionTimeout()", true);
        }
    }


<script type="text/javascript">
        var sessionTimeout = <%= Session.Timeout %>
       
        function DisplaySessionTimeout()
        {
            document.getElementById("<%= lblSessionTime.ClientID %>").innerText = sessionTimeout;
            sessionTimeout = sessionTimeout - 1;
           
            if (sessionTimeout >= 0)
                window.setTimeout("DisplaySessionTimeout()", 60000);
            else
            {
                alert("Your current Session is over.");
            }
        }
    </script>

Value type and reference type

http://www.albahari.com/valuevsreftypes.aspx

First, What Are Structs?

Put simply, structs are cut-down classes.  Imagine classes that don’t support inheritance or finalizers, and you have the cut-down version: the struct.  Structs are defined in the same way as classes (except with the struct keyword), and apart from the limitations just described, structs can have the same rich members, including fields, methods, properties and operators.  Here’s a simple struct declaration:
struct Point
{
   private int x, y;             // private fields

   public Point (int x, int y)   // constructor
  
{
         this.x = x;
         this.y = y;
   }

   public int X                  // property
  
{
         get {return x;}
         set {x = value;}
   }

   public int Y
   {
         get {return y;}
         set {y = value;}
   }
}    


Value and Reference Types

There is another difference between structs and classes, and this is also the most important to understand.  Structs are value types, while classes are reference types, and the runtime deals with the two in different ways.  When a value-type instance is created, a single space in memory is allocated to store the value.  Primitive types such as int, float, bool and char are also value types, and work in the same way.  When the runtime deals with a value type, it's dealing directly with its underlying data and this can be very efficient, particularly with primitive types.
With reference types, however, an object is created in memory, and then handled through a separate reference—rather like a pointer.  Suppose Point is a struct, and Form is a class.  We can instantiate each as follows:

Point p1 = new Point();         // Point is a *struct*
Form f1 = new Form();           // Form is a *class*

In the first case, one space in memory is allocated for p1
Iin the second case, two spaces are allocated: one for a Form object and another for its reference (f1).  It's clearer when we go about it the long way:
 
Form f1;                        // Allocate the reference
f1 = new Form();                // Allocate the object

If we copy the objects to new variables:
Point p2 = p1;
Form f2 = f1;

p2, being a struct, becomes an independent copy of p1, with its own separate fields.

 But in the case of f2, all we’ve copied is a reference, with the result that both f1 and f2 point to the same object.

This is of particular interest when passing parameters to methods.  In C#, parameters are (by default) passed by value, meaning that they are implicitly copied when passed to the method.  For value-type parameters, this means physically copying the instance (in the same way p2 was copied), while for reference-types it means copying a reference (in the same way f2 was copied).  Here is an example:

Point myPoint = new Point (0, 0);      // a new value-type variable
Form myForm = new Form();              // a new reference-type variable
Test (myPoint, myForm);                // Test is a method defined below

void Test (Point p, Form f)
{
      p.X = 100;                       // No effect on MyPoint since p is a copy
      f.Text = "Hello, World!";        // This will change myForm’s caption since
                                       // myForm and f point to the same object
      f = null;                        // No effect on myForm
}

Assigning null to f has no effect because f is a copy of a reference, and we’ve only erased the copy.
We can change the way parameters are marshalled with the ref modifier.  When passing by “reference”, the method interacts directly with the caller’s arguments.  In the example below, you can think of the parameters p and f being replaced by myPoint and myForm:

Point myPoint = new Point (0, 0);      // a new value-type variable
Form myForm = new Form();              // a new reference-type variable
Test (ref myPoint, ref myForm);        // pass myPoint and myForm by reference

void Test (ref Point p, ref Form f)
{
      p.X = 100;                       // This will change myPoint’s position
      f.Text = “Hello, World!”;        // This will change MyForm’s caption
      f = null;                        // This will nuke the myForm variable!
}

In this case, assigning null to f also makes myForm null, because this time we’re dealing with the original reference variable and not a copy of it.


Memory Allocation

The Common Language Runtime allocates memory for objects in two places: the stack and the heap.  The stack is a simple first-in last-out memory structure, and is highly efficient.  When a method is invoked, the CLR bookmarks the top of the stack.  The method then pushes data onto the stack as it executes.  When the method completes, the CLR just resets the stack to its previous bookmark—“popping” all the method’s memory allocations is one simple operation!
The heap can be pictured as a random jumble of objects.  Its advantage is that it allows objects to be allocated or deallocated in a random order. The heap requires the overhead of a memory manager and garbage collector to keep things in order.
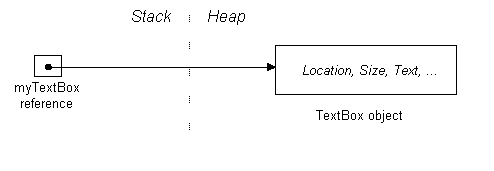
To illustrate how the stack and heap are used, consider the following method:

void CreateNewTextBox()
{
      TextBox myTextBox = new TextBox();             // TextBox is a class
}

In this method, we create a local variable that references an object.  The local variable is stored on the stack, while the object itself is stored on the heap:
The stack is always used to store the following two things:
  • The reference portion of reference-typed local variables and parameters (such as the myTextBox reference)
  • Value-typed local variables and method parameters (structs, as well as integers, bools, chars, DateTimes, etc.)
The following data is stored on the heap:
  • The content of reference-type objects.
  • Anything structured inside a reference-type object.

Memory Disposal

Once CreateNewTextBox has finished running, its local stack-allocated variable, myTextBox, will disappear from scope and be “popped” off the stack.  However, what will happen to the now-orphaned object on the heap to which it was pointing?  The answer is that we can ignore it—the Common Language Runtime’s garbage collector will catch up with it some time later and automatically deallocate it from the heap.  The garbage collector will know to delete it, because the object has no valid referee (one whose chain of reference originates back to a stack-allocated object).[1]  C++ programmers may be a bit uncomfortable with this and may want to delete the object anyway (just to be sure!) but in fact there is no way to delete the object explicitly.  We have to rely on the CLR for memory disposal—and indeed, the whole .NET framework does just that!
However there is a caveat on automatic destruction.  Objects that have allocated resources other than memory (in particular “handles”, such as Windows handles, file handles and SQL handles) need to be told explicitly to release those resources when the object is no longer required.  This includes all Windows controls, since they all own Windows handles!  You might ask, why not put the code to release those resources in the object’s finalizer?  (A finalizer is a method that the CLR runs just prior to an object’s destruction).  The main reason is that the garbage collector is concerned with memory issues and not resource issues.  So on a PC with a few gigabytes of free memory, the garbage collector may wait an hour or two before even getting out of bed!
So how do we get our textbox to release that Windows handle and disappear off the screen when we’re done with it?  Well, first, our example was pretty artificial.  In reality, we would have put the textbox control on a form in order to make it visible it in the first place.  Assuming myForm was created earlier on, and is still in scope, this is what we’d typically do:
myForm.Controls.Add (myTextBox);
As well as making the control visible, this would also give it another referee (myForm.Controls). This means that when the local reference variable myTextBox drops out of scope, there’s no danger of the textbox becoming eligible for garbage collection.  The other effect of adding it to the Controls collection is that the .NET framework will deterministically call a method called Dispose on all of its members the instant they’re no longer needed.  And in this Dispose method, the control can release its Windows handle, as well as dropping the textbox off the screen.
All classes that implement IDisposable (including all Windows Forms controls) have a Dispose method.  This method must be called when an object is no longer needed in order to release resources other than memory.  There are two ways this happens:
 - manually (by calling Dispose explicitly)
 - automatically: by adding the object to a .NET container, such as a Form, Panel, TabPage or UserControl.  The container will ensure that when it’s disposed, so are all of its members.  Of course, the container itself must be disposed (or in turn, be part of another container).
In the case of Windows Forms controls, we nearly always add them to a container – and hence rely on automatic disposal.
The same thing applies to classes such as FileStream—these need to be disposed too.  Fortunately, C# provides a shortcut for calling Dispose on such objects, in a robust fashion: the using statement:
using (Stream s = File.Create ("myfile.txt"))
{
   ...
}
This translates to the following code:
Stream s = File.Create ("myfile.txt");
try
{
   ...
}
finally
{
   if (s != null) s.Dispose();
}
The finally block ensurse that Dispose still gets executed should an exception be thrown within the main code block.
What about in WPF?
Most of the elements in WPF don’t wrap unmanaged handles requiring explicit disposal. So you can mostly ignore the disposal with WPF!

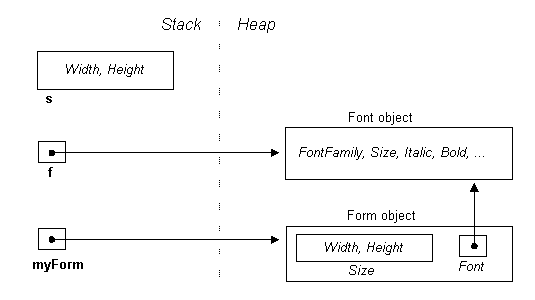
A Windows Forms Example

Let's look a couple more types you’ll come across often in Windows Forms applications.  Size is a type used for representing a 2-dimensional extent and Font, as you would expect, encapsulates a font and its properties.  You can find them in the .NET framework, in the System.Drawing namespace. The Size type is a struct—rather like Point, while the Font type is a class.  We'll create an object of each type:
Size s = new Size (100, 100);          // struct = value type
Font f = new Font (“Arial”,10);        // class = reference type
and we’ll also create a form.  Form is a class in System.Windows.Forms namespace, and is hence a reference type:
Form myForm = new Form();
To set the form's size and font, we can assign the objects s and f to the form via its properties:
myForm.Size = s;
myForm.Font = f;

Don't get confused by the double usage of the identifiers Size and Font: now they are referring to members of myForm and not the Size and Font classes.  This double usage is acceptable in C# and is applied extensively throughout the .NET framework.
Here's what it now looks like in memory:
As you can see, with s, we've copied over its contents, while in the case of f, we've copied over its reference (resulting in two pointers in memory to the same Font object).  This means that changes made via s will not affect the form, while changes made via f, will[2].
In-Line Allocation
Previously we said that for value-typed local variables, memory is allocated on the stack.  So does that mean the newly copied Size struct is also allocated on the stack?  The answer is no, because it’s not a local variable!  Instead, it’s stored in a field of another object (in this case a form) that’s allocated on the heap.  Therefore, it must, too, be allocated on the heap.  This mode of storage is called "in-line". 

Fun with Structs

We've made a slightly simplifying assumption in the diagrams in that Size and Font are depicted as fields in the Form class.  More accurately, they are properties, which are facades for internal representations we don’t get to see.  We can imagine their definitions look something like this:
class Form
{
      // Private field members
      Size size;
      Font font;

      // Public property definitions
      public Size Size
      {
            get    { return size; }
            set    { size = value; fire resizing events }
      }
      public Font Font
      {
            get    { return font;  }
            set    { font = value; }
      }
}
By using properties, the class has an opportunity to fire events when the form’s size or font changes.  It provides further flexibility in that other size-related properties, such as ClientSize (the size of a control’s internal area without title bar, borders, or scroll bars) can work in tandem with the same private fields.
But there is a snag.  Suppose we want to double the form’s height, through one of its properties.  It would seem reasonable to do this :
myForm.ClientSize.Height = myForm.ClientSize.Height * 2;
or more simply:
myForm.ClientSize.Height *= 2;
However, this generates a compiler error:
Cannot modify the return value of 'System.Windows.Forms.Form.ClientSize' because it is not a variable
We get the same problem whether we use Size or ClientSize.  Let’s look at why.
Imagine ClientSize as a public field rather than a property.  The expression myForm.ClientSize.Height would then simply reach through the membership hierarchy in a single step and access the Height member as expected.  But since ClientSize is a property, myForm.ClientSize is first evaluated (using the property’s get method), returning an object of type Size.  And because Size is a struct (and hence a value-type) what we get back is a copy of the form’s size.  And it’s this copy whose size we double!  C# realizes our mistake, and generates an error rather than compiling something that it knows won’t work.  (Had Size been defined instead as a class, there would have been no problem, since ClientSize’s get accessor would have returned a reference, giving us access to the form’s real Size object.)
So how then do we change the form’s size?  You have to assign it a whole new object:
myForm.ClientSize = new Size
  (myForm.ClientSize.Width, myForm.ClientSize.Height * 2);
There’s more good news in that with most controls we usually size them via their external measurements (Size rather than ClientSize) and for these we also have ordinary integer Width and Height properties that we can get and set!
You might wonder if they could they have saved all this bother by defining Size as a class rather than a struct.  But if Size was a class, its Height and Width properties would probably have been made read-only to avoid the complication of having to raise events whenever their values changed (so that the control can know to resize itself).  And as read-only properties, you would be forced to go about changing them by creating a new object—so we’d be back to square one!